
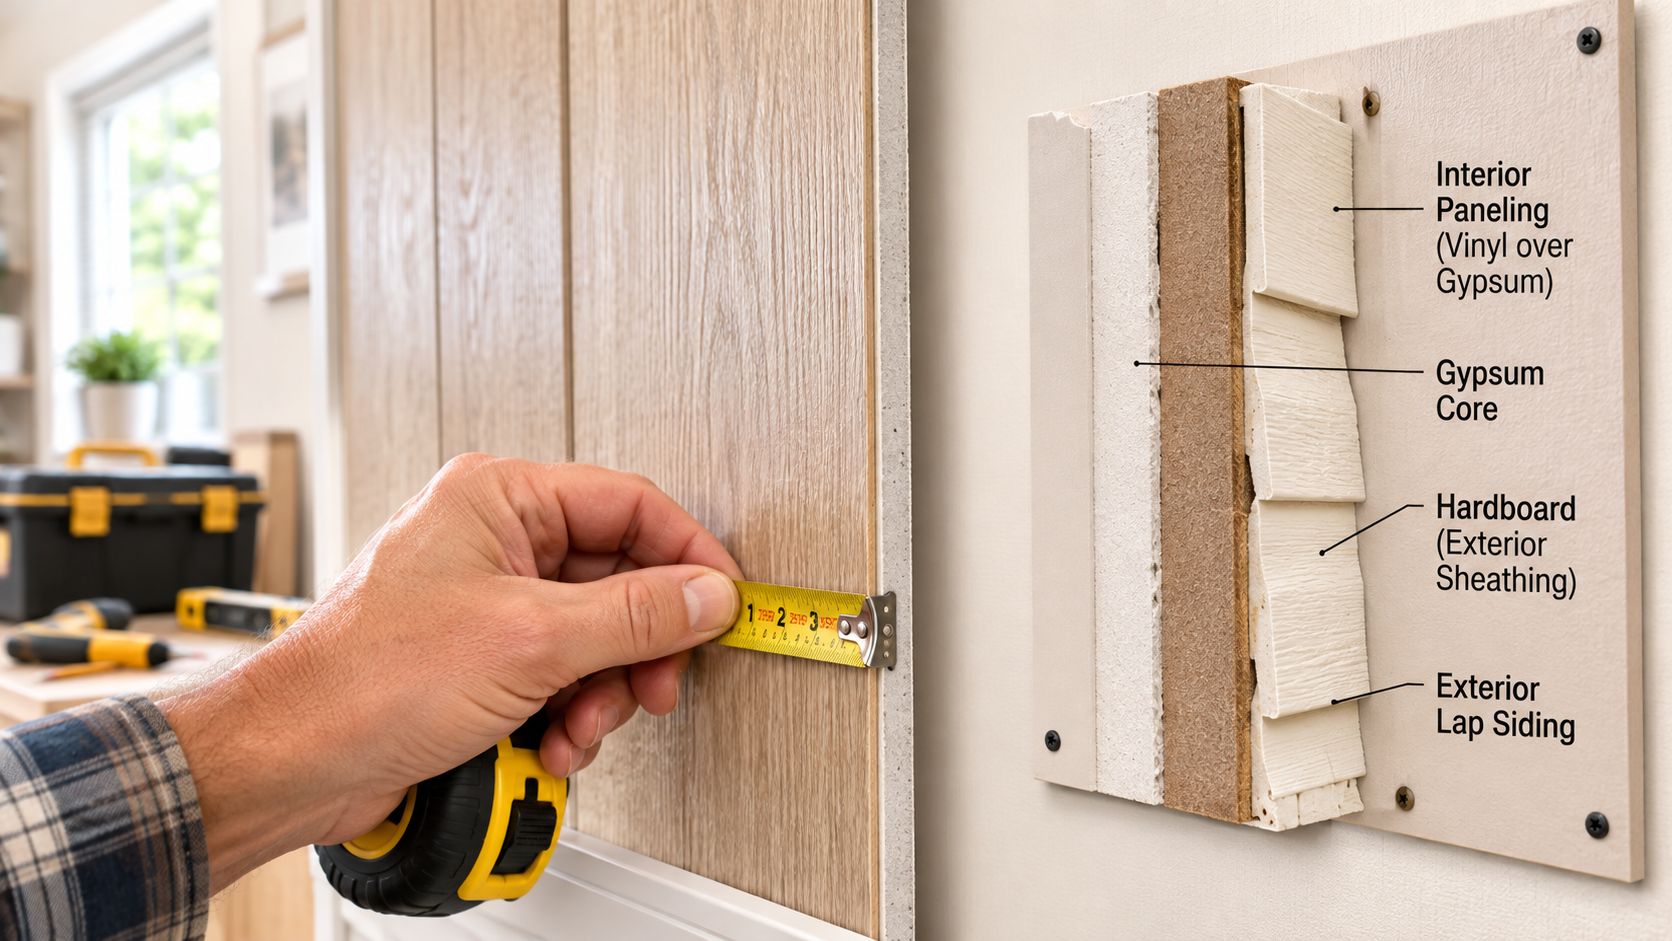
You press the wall beside the hallway in your older double-wide and feel it give slightly under your hand. The surface looks like wallpaper, but it may be vinyl-over-gypsum, hardboard, or another factory panel. The soft spot may be a small finish problem, or it may point to moisture behind the wall.
That uncertainty is why mobile home paneling deserves more attention than a quick patch and a coat of paint. In a manufactured home, the interior wall surface can contribute to the wall assembly, fire performance, moisture control, and resistance to movement. Before you choose a modern finish, first identify which layer has failed.
What Paneling Actually Is in a Mobile Home
In a site-built house, workers usually assemble the wall at the property. They place studs, insulation, sheathing, drywall, joint compound, and finish materials in separate stages. A manufactured home follows a different production path. Much of the wall is assembled in a factory, then transported and installed as part of a larger system.
That difference matters. A panel may look decorative, but it can be attached directly to the framing and help the wall resist movement. HUD and code materials describe interior paneling as part of the structural wall system. They also show that these panels are commonly glued and stapled to sidewall studs, while interior structural walls must resist at least 5 psf of horizontal load under 24 CFR 3280.305(f)(2), as shown in the HUD and manufactured-home code materials.
Practical rule: Treat a loose, swollen, or badly delaminated panel as part of a wall-system inspection, not just a decorating task.
The panel can serve several roles at once. It provides the visible finish. It may help limit air and vapor movement through the wall. Its material and surface treatment can affect the interior finish's fire behavior. A weak panel can also interrupt the path that transfers movement and loads into the frame, especially near doors, windows, and other openings.
Exterior paneling is different. Lap siding, T1-11 plywood, aluminum, vinyl, and skirting are outside the interior wall assembly. They help shed weather and protect the home, but they still must suit the manufactured home's transport, wind, moisture, and code requirements. Don't treat exterior siding as a thin cosmetic skin.
The first useful question is simple. Is the visible finish failing, or is the wall behind it failing? Your repair plan depends on that answer.
The Materials You Will Most Likely See
The quickest way to identify a panel is to inspect its face, edge, and fastening pattern. Look behind a switch plate, inside a closet, or at a damaged corner where the layers are easier to see. Take a small sample to a manufactured-home supply retailer before ordering a replacement.
Vinyl-over-gypsum panels
Vinyl-over-gypsum, often called VOG, has a printed vinyl face bonded to a gypsum core. Many factory walls use a wood-grain pattern or another printed design, with narrow battens covering panel joints. The surface usually doesn't have the paper-and-joint-compound look of ordinary drywall.
VOG is easy to mistake for wallpaper. It isn't. Painting over it may require a compatible primer, and removing the vinyl face can damage the gypsum beneath it. A replacement may also differ in color, texture, or groove spacing even if it appears close in a photograph.
Gypsum and conventional drywall
Bare gypsum may be visible behind a damaged VOG face. Newer homes may use gypsum panels with site-applied paint, making the wall look much more like a conventional house. The familiar appearance doesn't mean the framing, thickness, fastening, or movement tolerance is identical to site-built construction.
Installation thickness matters. The interior wall paneling guide states that 1/8-inch panels must be applied to solid walls, while panels 3/16 inch or thicker may be installed directly to studs. It also calls for a solid insulated exterior wall and a 4-mil or greater polyethylene vapor barrier behind the studs for direct-to-stud installation.
Hardboard and MDF
Older homes may contain hardboard or medium-density fiberboard paneling. These products can have embossed textures, printed wood patterns, or a smooth face intended for paint. They're light and practical, but exposed cut edges can swell when water reaches the substrate.
Pay special attention to seams, plumbing walls, window corners, and the bottom edge near the floor. A small surface stain may be repairable. A soft edge that crumbles under a screwdriver indicates a deeper material failure.
Exterior siding materials
Outside, you may find T1-11 plywood, hardboard lap siding, aluminum, or vinyl. These materials belong to the weather side of the home. They shouldn't be selected by appearance alone, because the replacement must fit the existing sheathing, trim, flashing, and attachment method.
| Material | Where Used | Common Era |
|---|---|---|
| Vinyl-over-gypsum | Interior walls with printed faces and battens | Common in many later factory-built homes |
| Gypsum board | Interior walls behind finishes or with paint | More common in newer construction |
| Hardboard or MDF | Interior paneling and some exterior siding | Often found in older or budget-tier homes |
| T1-11 plywood | Exterior wall siding | Used across different manufactured-home generations |
| Aluminum or vinyl | Exterior siding | Common exterior replacement choices |
The era descriptions are useful clues, not proof. A renovation, addition, or prior repair can introduce a different material into the same home.
When to Repair and When to Replace
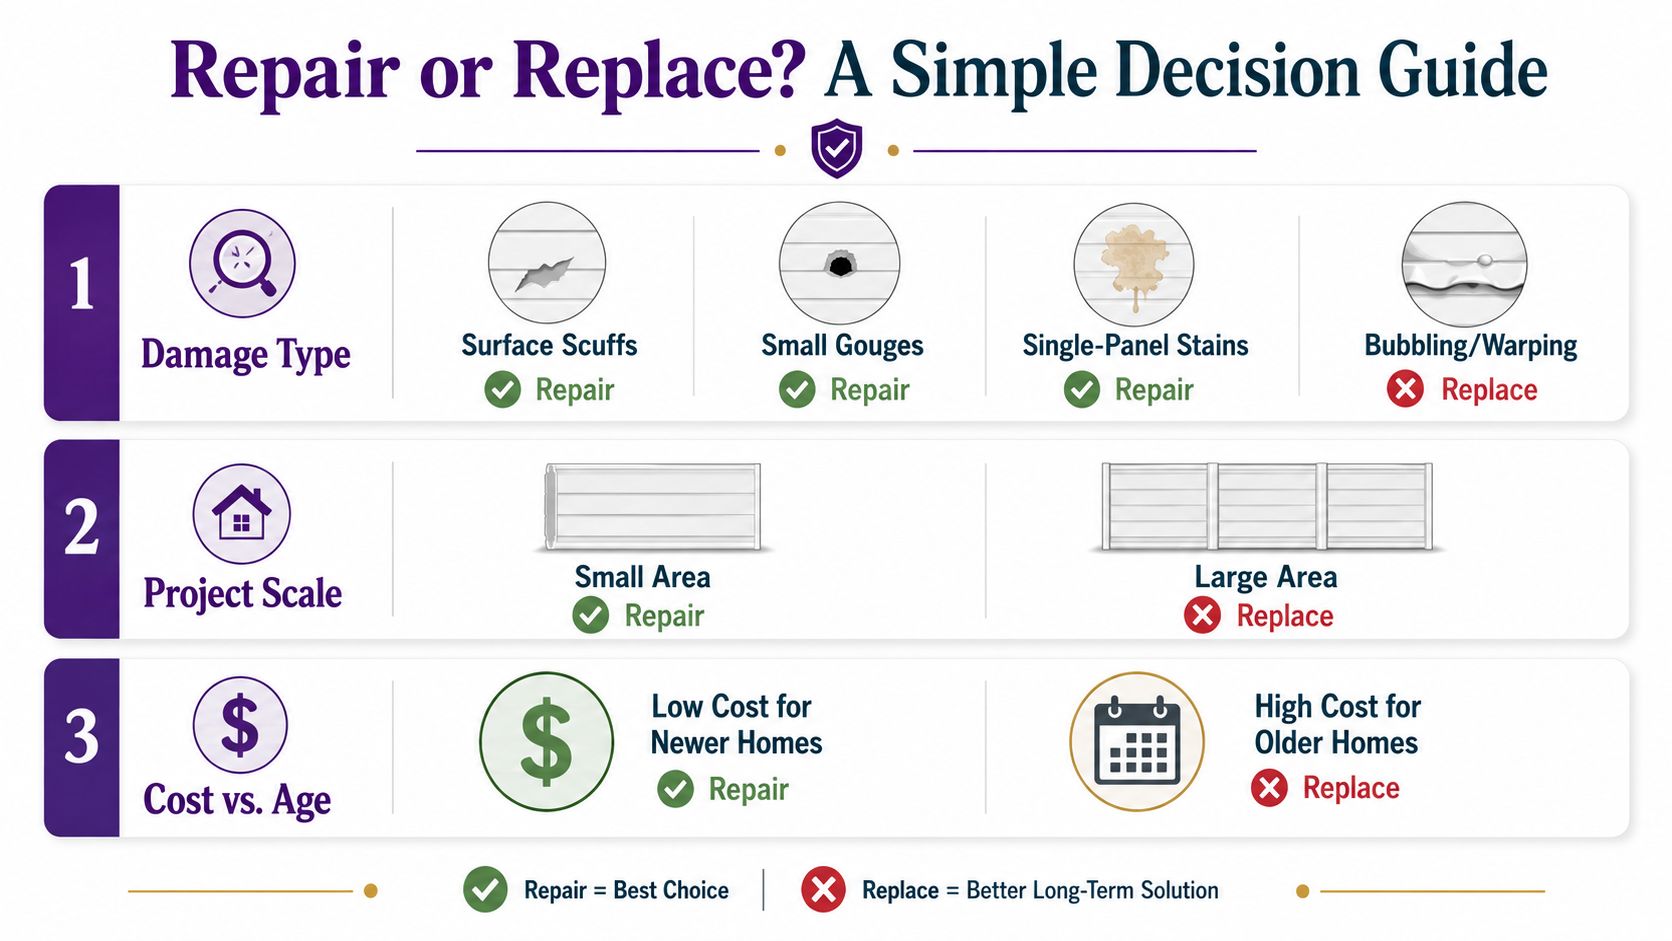
A repair makes sense when the damage is limited and the substrate remains sound. A replacement makes more sense when the panel has lost its shape, bond, or strength. Start with the damage itself, then consider the affected area and the source of the problem.
Surface scuffs, small gouges, and a single-panel stain may respond to cleaning, filler, primer, paint, or a carefully matched patch. Bubbling across several panels, a soft wall area, or vinyl that has separated from its core points to a failed substrate. Covering that condition leaves the weak material in place.
The size of the damaged area changes the calculation. If only a small portion of the wall is affected, a local repair can preserve the surrounding finish. Once damage approaches roughly 10% to 15% of the wall surface, a larger replacement may make more sense because labor, preparation, and color matching can erase the benefit of patching.
Use this three-part inspection
Identify the damage. Press gently around the stain or loose area. Compare firm sections with soft ones. Look for swollen edges, cracked seams, or a face layer that lifts easily.
Map the scope. Mark every affected panel with painter's tape. Include nearby areas that show discoloration or movement. This gives you a real work area instead of an optimistic guess based on the most visible spot.
Find the cause. Check plumbing connections, windows, roof penetrations, exterior seams, and heating or cooling lines near the wall. New paneling won't last if the leak or condensation problem remains.
Mid-wall replacement is especially difficult in a VOG home. The original groove pattern and printed color may no longer be available, and a close match can still look obvious under ordinary room light. A full-wall redo often produces a cleaner result than placing a visibly different rectangle in the middle of the room.
Factory-built wall panels can be large. Technical guidance describes panels often measuring about 6 inches thick and 8 feet tall, with lengths reaching roughly 22 to 24 feet. It identifies joints and major openings as vulnerable areas, so a repair must preserve sound fastening and support around doors and windows, as explained in the Department of Energy wall-construction guidance.
Before removing anything, write down the damage, its approximate scope, and the suspected source. If the wall feels soft beyond the visible stain, arrange a qualified inspection. The Maya Blog can help with general manufactured-home questions, but it can't replace an on-site building assessment.
Cost Ranges and What Moves the Number
Paneling bids vary because the visible panel is only part of the job. A small VOG patch may involve cleaning, cutting, adhesive, a batten, and touch-up work. A room conversion to drywall may involve removal, framing repairs, insulation changes, taping, sanding, painting, and disposal.
No reliable universal price applies to every manufactured home. Ask each contractor to separate surface work from hidden substrate work. That makes a low bid easier to evaluate.
| Project Scope | Typical Range (USD) | Main Cost Drivers |
|---|---|---|
| Small patch repair | Not established in the verified data | Damage size, access, matching finish, and whether the substrate is sound |
| Single-panel swap | Not established in the verified data | Replacement availability, trim, fasteners, paint blending, and removal |
| Room-level interior replacement | Not established in the verified data | Wall area, drywall finishing, framing condition, insulation, and disposal |
| Exterior panel or siding replacement | Not established in the verified data | Sheathing condition, flashing, trim, weather exposure, labor, and permits |
The figures above are deliberately not filled with invented dollar ranges. The available verified material doesn't provide dependable prices for these scopes. A contractor may still give you a useful bid, but it should identify the assumptions behind it.
Material availability can move the number sharply for older homes. A discontinued texture may require a broader replacement area. A contractor may need to source specialty panels, fabricate trim, or use a contrasting batten to make the transition intentional.
Square footage matters, but so does access. Cabinets, built-ins, windows, doors, vents, and electrical boxes increase cutting and finishing time. Damaged studs, wet insulation, or deteriorated sheathing can turn a panel replacement into a wall repair.
Permits and disposal belong in the written estimate. Local rules vary, and older panel products may require handling that a contractor includes separately. Two bids can differ by hundreds because one includes substrate repair and the other prices only the visible skin.
Get the scope in writing before work begins. If the project connects to a purchase or loan, the manufactured-home dealership resources may help you organize the insurance and transaction questions separately from the construction estimate.
Why the Trendy Panels May Not Fit Your Home
A wall treatment that works in a site-built living room may create problems in a manufactured home. Shiplap, reclaimed wood, heavy tile, and large-format panels add material to a wall that may have thinner framing, wider stud spacing, and a fastening pattern designed for a lighter factory finish.
Weight is only part of the issue. The existing panel may not provide a reliable base for new fasteners. A thick overlay can also change the location of outlets, window trim, door casing, and heating registers. If the new surface traps moisture against an old panel, a cosmetic upgrade can hide deterioration.
Before choosing a product, expose a small area and locate the framing. Check the stud spacing. Confirm the existing panel is dry, firm, and attached. Then ask how the new material will be supported at seams, corners, and openings.
A good accent wall respects the wall behind it.
Moisture behavior deserves equal attention. Tile and dense panels may resist surface water, but water can still enter at edges, plumbing penetrations, or an exterior seam. Wood products can respond to humidity by swelling or shrinking. A material that looks stable in a showroom may move differently from the factory panel beneath it.
Some lightweight accent products can work as overlays when the existing wall is sound and the installation follows the product requirements. Other designs require added framing or blocking. Don't assume adhesive alone will carry a heavy finish through seasonal movement.
The strongest upgrade is often the least dramatic one. Repair the cause, reinforce weak areas, choose a low-weight material, and keep access to utilities possible. If you want a feature wall, test the installation in a small, inconspicuous section before committing the whole room.
Code, Moisture, and What to Check Before You Start
Three constraints should shape the project before you buy panels. The first is the federal manufactured-home construction code. The second is your local jurisdiction's rules for alterations. The third is moisture movement through the wall.
HUD requirements address more than appearance. Federal rules have limited certain foam plastic materials used as siding backer board or sheathing to a maximum thickness of 3/8 inch when separated from the interior and tested at a flame-spread rating of 75 or less, as shown in the 1979 federal manufactured-home regulations. A separate fire study explains that wall and ceiling finishes can affect fire spread, heat, smoke, and toxic gas production. It also records the then-applicable interior-finish limit of 200 for surface flame spread under ASTM E-84 testing, described in the National Bureau of Standards fire report from 1978.
Check the home before cutting
Find the data plate and record the original wall information.
Inspect soft areas near plumbing fixtures, windows, and exterior seams.
Look for musty odors, staining, swollen edges, and loose battens.
Confirm the proposed material's thickness, fire information, and vapor-control requirements.
Ask the local building department if the work needs a permit or inspection.
A material change can affect the wall's fire classification and vapor behavior. It can also alter the thickness around trim and openings. The data plate won't answer every renovation question, but it gives you a starting record of how the home was built.
Resale adds another reason to document the work. An inspector or buyer may ask why a wall was rebuilt, what caused the original damage, and whether permits were required. Keep photos of the wall before removal, receipts for materials, the contractor's scope, and any approval from the jurisdiction.
Your next step is modest but useful. Photograph the damaged area, locate the data plate, and ask a qualified contractor to inspect the panel, framing, and moisture source before you order replacement material. For questions about the insurance side of an ownership change, you can try Maya.
Maya can return manufactured-home insurance quotes so you can compare options while you plan repairs or prepare for resale. Maya returns quotes, does not bind coverage, and does not give coverage advice; the licensed agent owns the placement. Visit Maya and speak with a licensed agent who uses the service.