

You're at the kitchen table, the keys are already in your pocket, and the stack of paper sits between you and the last signature. That's the first real moment you see a mobile home insurance policy, and it can feel like a pile of forms with one promise hidden inside.
Read it in order. That's the trick.
The declarations page comes first, then the coverage forms, then the endorsements, then the jacket with contact details and legal boilerplate. If you walk through those pages the way an agent does, you can verify what's covered, what isn't, and which parts changed the policy from the one you thought you were buying.
The First Time You See Your Policy
The folder usually lands on the table with a soft thud. Inside, you'll see a declarations page, the coverage forms, any endorsements, and the policy jacket. The stack looks formal, but each piece has a different job.
The declarations page is the summary sheet. The coverage forms hold the actual promises. Endorsements change those promises. The jacket is where you'll usually find contact information and general policy language.
Read the paper, not the pitch.
That matters because a policy can sound simple in a sales conversation and still turn out narrow in the fine print. A person can say “you're covered,” but the page that decides a claim is the one with the limits, dates, and exclusions.
For a new owner, the smartest habit is to treat the policy like a map. Start with the summary, move into the coverage grants, then check the carve-outs and add-ons. That order keeps you from missing something important on page six because page two looked reassuring.
Reading the Declarations Page
The declarations page is where the policy becomes specific to your home. It lists the named insured, the policy period, the dwelling limit, the address, the deductible, and other identifying details. If any of those fields are off, the claim file gets messy fast.
A spouse added after closing may not appear automatically. A titled home with the wrong serial number can create a mismatch between the policy and the home you own. And if the mailing address doesn't line up with the lienholder record, a lender can push back before the file is even clean.
| Field | What It Shows | Why It Matters |
|---|---|---|
| Named insured | The person or people covered | Only the names listed are part of the contract |
| Policy period | The start and end dates | Claims have to fall inside that window |
| Dwelling coverage | The limit for the structure | It's the ceiling, not a repair estimate |
| Property address | The exact insured location | The policy follows that site and setup |
| Deductible | Your share of a claim | Lower deductibles usually mean higher premium |
| Serial or HUD details | The home's identifying numbers | Mismatches can slow or complicate a claim |
Keep an eye on the address and the foundation or tie-down setup tied to it. Manufactured-home policies are written for a specific location and installation, not just a general owner name. If the home moves, the policy details often need to move with it.
Practical rule: If the declarations page doesn't match the home, stop and fix that before you file anything.
For a plain-language glossary page on this part of the policy, see declarations page.
The Four Coverage Parts and How They Work Together
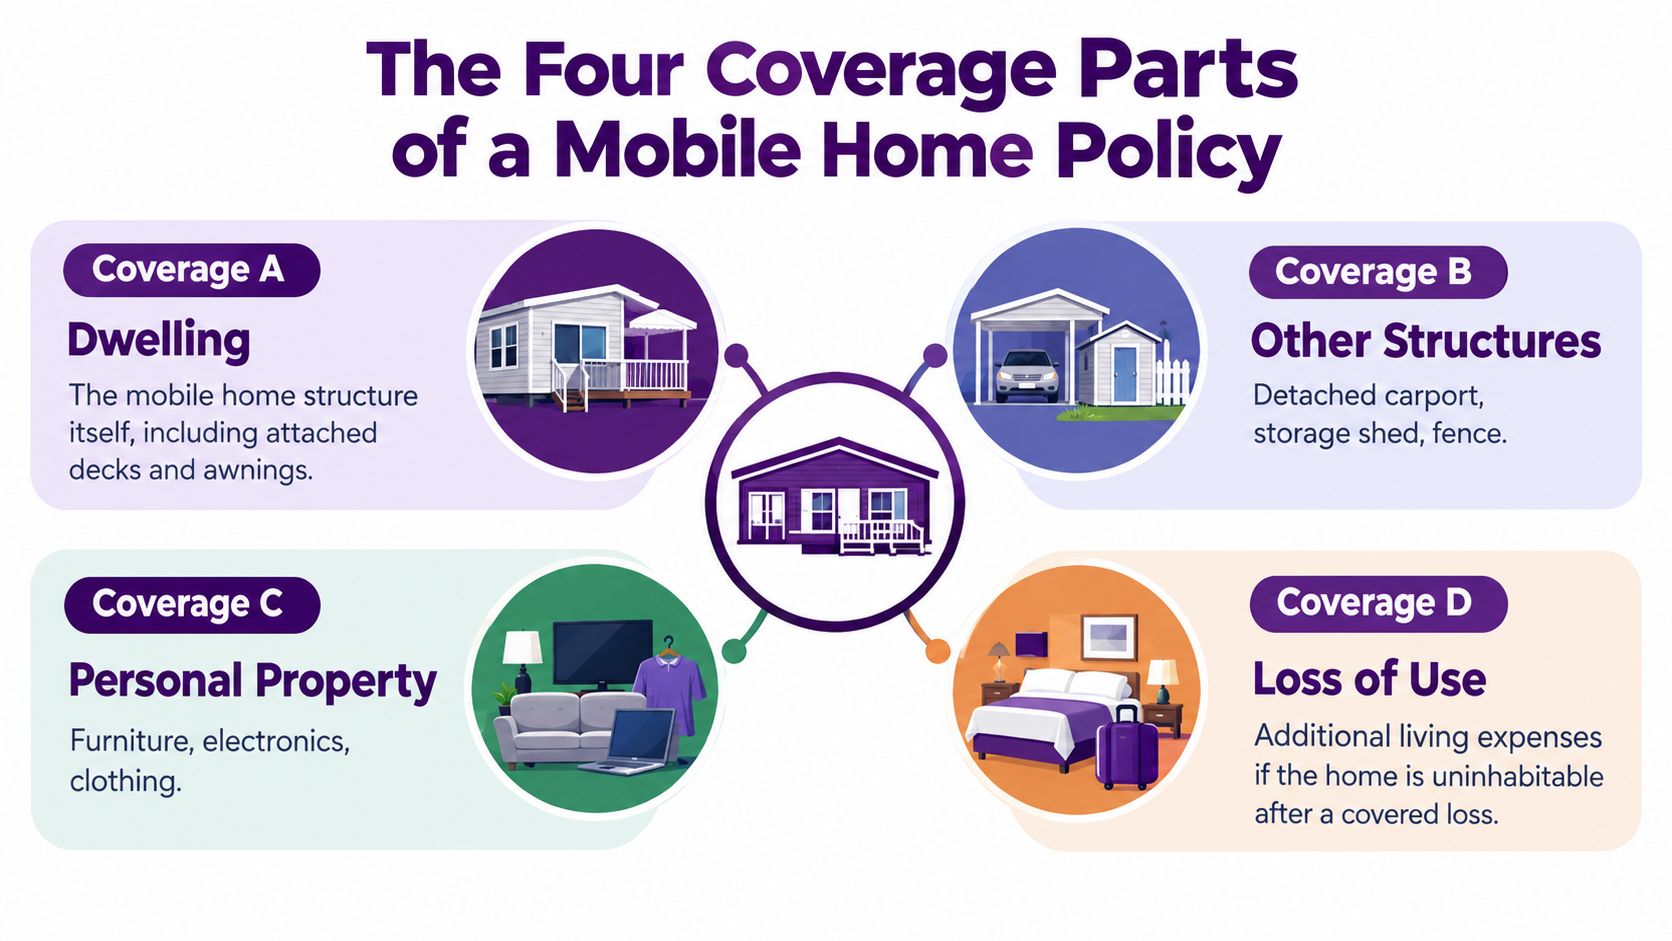
Coverage A is the home itself. Coverage B is the detached stuff around it. Coverage C is your belongings. Coverage D pays for extra living costs if the home can't be lived in after a covered loss.
Coverage A Covers the Structure
This is the shell of the home. Roof, walls, built-in parts, and attached features usually sit here. If a storm tears into the structure, this is the bucket that pays to repair or replace the home up to the stated limit.
Coverage B Covers Detached Items
A detached carport, shed, or fence usually lives in this bucket. It's separate from the structure, and that separation matters. Damage to a detached feature does not pull money from the same bucket as the dwelling limit.
Coverage C Covers Your Things
Furniture, clothes, electronics, and similar personal items fall here. If a bedroom gets hit, the bed, dresser, and clothing are handled separately from the roof repair. That's why a policy can look “large” on paper and still leave you short if your contents are underestimated.
Coverage D Pays for Temporary Living Costs
If the home is unlivable after a covered loss, this part can pay some of the added cost of living elsewhere. Hotel bills and similar expenses often land here. The key is that the home has to be uninhabitable because of a covered event.
A tree through the bedroom roof is a good test case. Coverage A handles the structure, Coverage C handles the damaged contents, Coverage B may apply if a detached deck or shed gets crushed, and Coverage D helps with the hotel while repairs are underway.
Each coverage part has its own limit. The buckets do not pool together.
For a quick glossary on settlement math, see actual cash value.
Actual Cash Value Versus Replacement Cost
Many owners get surprised by this distinction. Actual cash value means the insurer pays depreciated value. Replacement cost means the insurer pays what it takes to repair or replace with similar materials at current prices, without subtracting depreciation.
A roof is the easiest place to see the difference. If an older roof is damaged, the ACV payment is smaller because the insurer factors in age and wear. Replacement cost is usually higher because it aims at the cost of making the repair now, not the reduced value of the old roof.
| Line Item | Actual Cash Value | Replacement Cost |
|---|---|---|
| Roof loss | Depreciated payment | Full repair or replacement cost |
| Depreciation | Subtracted | Not subtracted |
| Out-of-pocket gap | Higher | Lower |
| Claim outcome | Smaller check | Larger check after work is done |
Manufactured homes often face tighter treatment here because carriers look closely at age and condition. Older homes are more likely to end up on ACV terms, and replacement cost can be harder to get. That is one reason you should read the settlement wording before you think about premium alone.
A cheap policy can be expensive after a loss.
The policy language may also say that the balance is paid after repairs are completed. That matters because it helps avoid underinsurance at the point of loss, but only if you know the rule in advance and keep the receipts and contractor paperwork.
Exclusions and the Endorsements That Close the Gaps
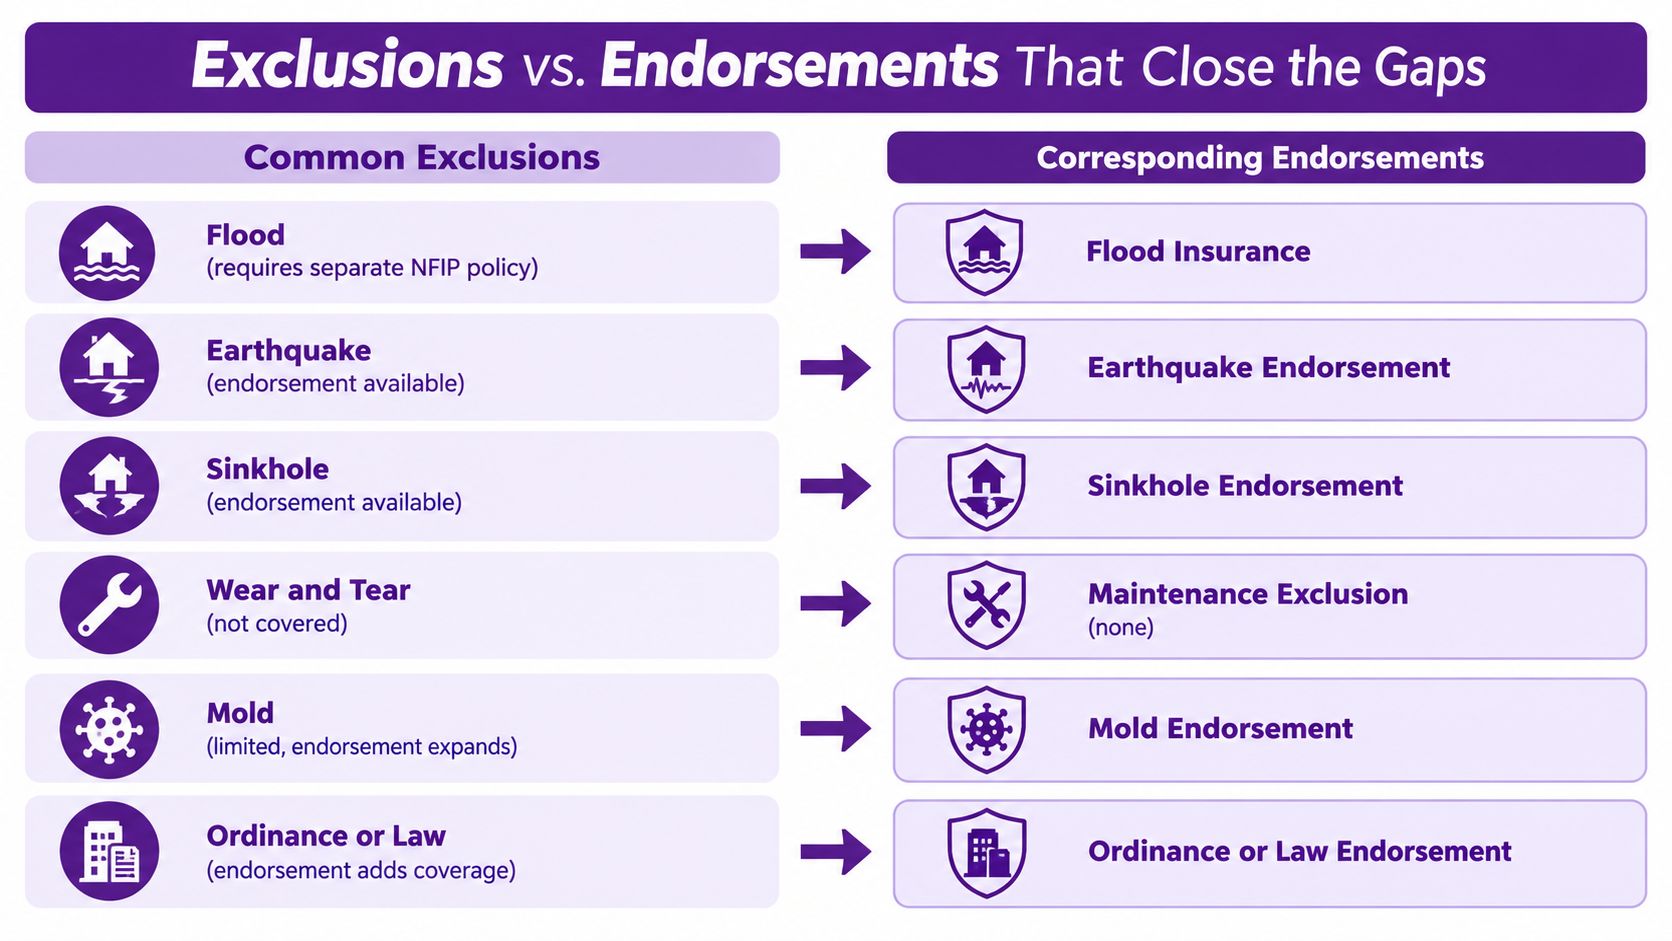
The exclusions page is the part people skip and regret later. It tells you what the policy will not pay for, even if the damage looks dramatic.
Flood is the big one. If water rises from outside the home, that usually sits outside the standard policy and needs separate flood protection. Earthquake is often separate too. Sewer or drain backup may need an extra endorsement. Wear and tear never becomes a covered claim just because the damage is inconvenient.
The Gaps That Catch People
A freeze can split pipes while the home sits empty. A storm can push water up under the skirting. A damaged tie-down system can fail under stricter wind expectations years after installation. None of those situations should be assumed covered just because a storm was involved.
Ordinance or law coverage is another one to read slowly. If local code now requires upgrades after a covered loss, the basic repair cost and the code upgrade cost are not always the same thing. The endorsement is what can help with that gap.
The Add-Ons That Matter
Endorsements are policy changes written onto the contract. They can fill a hole, narrow a gap, or add a special condition. The exact language matters more than the label on the page.
For a plain glossary page on this part of the contract, see endorsement.
If you live where wind, water, or freeze losses are common, ask how the policy treats those events before you sign. A policy that looks broad can still leave the exact kind of damage you worry about outside the contract.
Questions to Bring to Your Agent
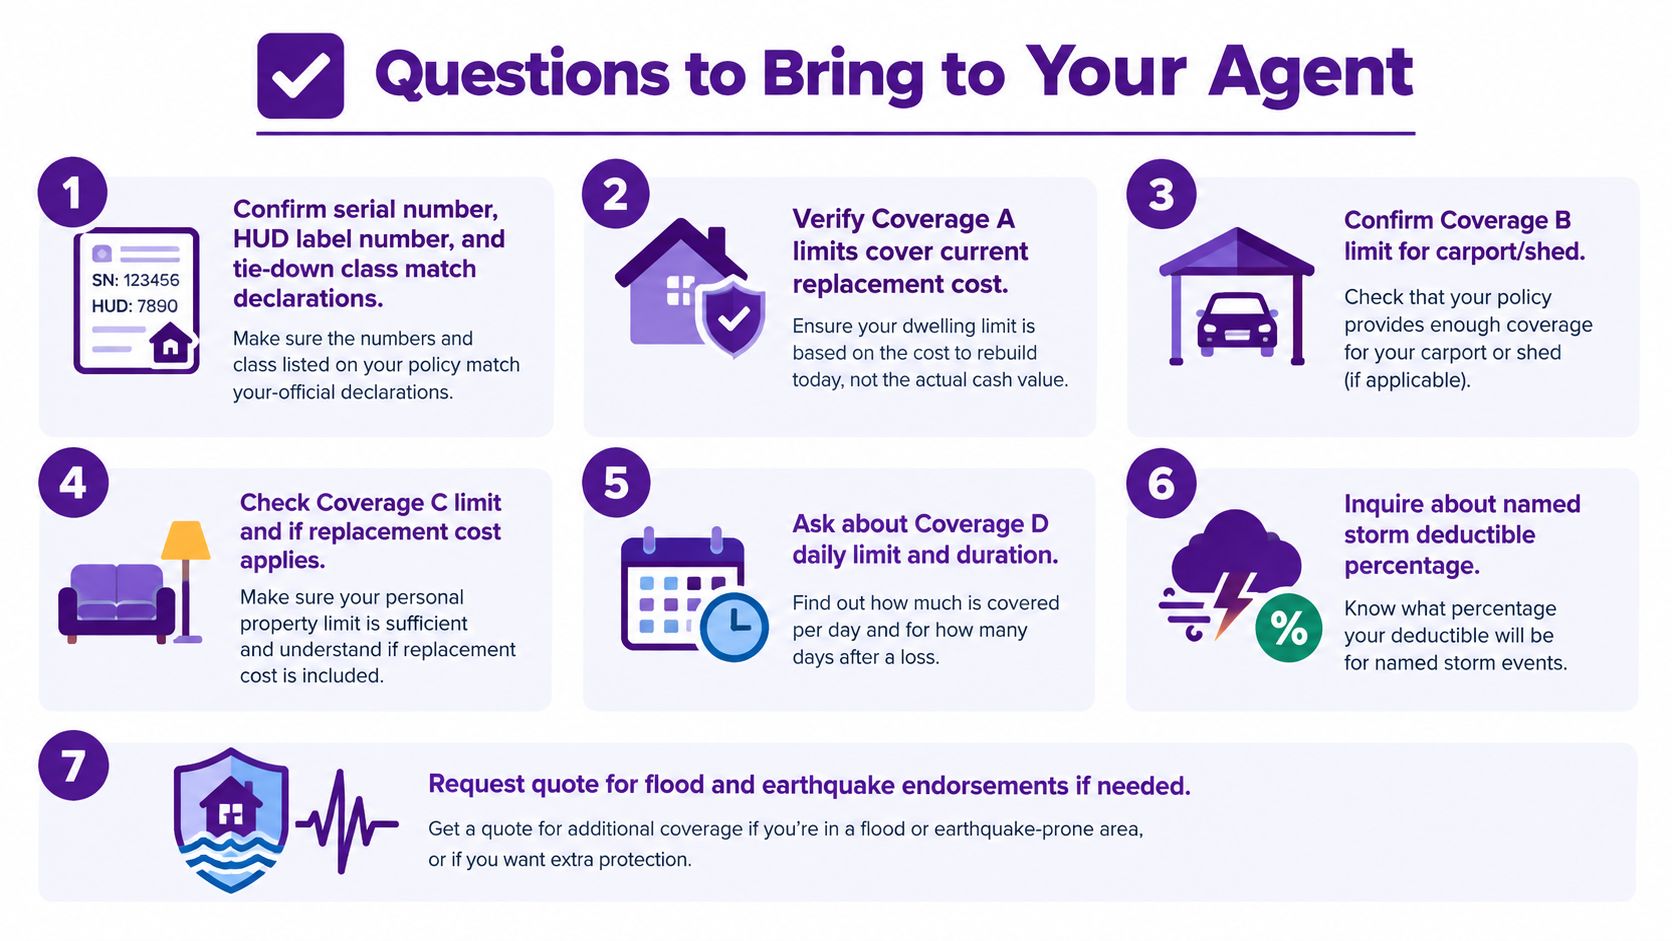
Bring the declarations page with you. Then ask in this order.
- Do the serial number, HUD label number, and tie-down class match the home and lender file?
- Does Coverage A reflect today's rebuild cost, not the purchase price?
- Is Coverage B enough for the carport, shed, or fence?
- Does Coverage C match what's inside the home?
- Is Coverage D enough for temporary living costs if the home is unlivable?
- Is the dwelling settled on ACV or replacement cost?
- Which endorsements are included, optional, or missing for flood, earthquake, water, and freeze risk?
Those questions force the policy to answer the same way your claim file will later. They also make it easier to spot a mismatch before the policy is locked in.
If the answers feel vague, ask for the exact page and paragraph. That's not being difficult. It's reading the contract.
One Habit That Makes the Policy Useful
Pull the declarations page and endorsements twice a year, once at daylight saving time and once at renewal. Confirm the address, the insured name, the policy period, the deductible, and any new endorsements. Then skim the exclusions to see whether a renovation, new skirting, a converted porch, or a moved tie-down system changed the risk.
That habit catches coverage drift before a loss does. It also gives you a clean paper trail if a question comes up later.
Maya returns quotes from multiple carriers so you can compare limits, deductibles, and policy wording in one place. Maya returns quotes, does not bind coverage, and does not give coverage advice, and the licensed agent owns the placement. If you want to compare what the policy pages look like before you sign, visit Maya.